When I was growing up my Papa called me his princess. My husband and son treat me like one to this day. Yet, for the longest time I was a pauper to the clutter in my every day life in my home and my finances. Then one day I decided it was time to stop living like a pauper and to be the princess everyone thought of me as. This is the journey I took to de-clutter all aspects of my life and become a true PRINCESS!
Showing posts with label Embossing Folders Storage. Show all posts

Monday, March 3, 2014

OFFENDING HOME OFFICE: PART 8


As the week rolls on I find more and more to clean, sort, organize whatever you want to call it.  While most of the drawers and such have been previously organized during the big culling event last year there are odds and ends to deal with on a daily basis. I have a huge feeling that once the room is “completed” I’ll be going back through those drawers real soon and culling more as well as tidying up more in them.

Some organization is for convenience once I get into full production on cards, scrapbook pages, charts and such more than storage.  One such item was the swatch tags I did today as my project.  I decided to start them now before my embossing folder collection grew too large.

Again this is an idea I scraplifted from various sites and then tweaked it to my needs.  Most of these swatches I have seen are done on a hinged type circle key ring and in solid white.  I chose to repurpose what I already had and expand the thought a bit.
Basically these are samples of each embossing folder I have.  I made my sample cards out of white cardstock, just as everyone else has, but I also put lavender dividers in for ease of use in the future. 

Let me back up here and explain how I did it a bit better.  You could use ready made tags for this project if you like, but I have the Plantin Schoolbook Cartridge for my Cricut machine and it has a nice tag shape in it.  So I cut my own.

Setting the machine to make 4” white tags and using the fill the page feature I was able to easily get eight white tags out of each sheet.  If I had cared to work at it a bit more I could have got ten, but I was in a hurry and had plans for that additional cardstock on the edge that wasn’t going to be cut for tags.  

I cut enough to make two full sets of the swatches, plus a few extras to use in the future.  

I chose to make two sets for sheer laziness in the long run.  I wanted one set to keep in the craft room for when I was designing projects and another set to leave in my truck for when purchasing folders to help me avoid purchasing duplicates.

On the back of each tag I wrote what brand it was, the name of the folder and the size.  Then I embossed it.  One of each folder for each set.

Once I had completed all the folders I then changed my cutting size to 4.5” and switched to lavender cardstock.  This allowed for six per sheet with the excess on the side for the future project.  

These tags remained unembossed, but instead were labeled on the bottom edge with the different categories I file my folders under: celebrations, fauna, flora etc. 

Next came binding the swatches together.  This is where my repurposing came in.  I did not own any of those hinged type key rings, which I believe are called book rings,  so I looked around for alternatives.  

I had just culled items under my bathroom sink earlier that day and came up with a ring that previously held elastic ponytail holders.  We are a bunch of long haired people here so we purchase a lot of those bands.  

By removing the bead from one end of the holder I was able to easily fill it with the swatches and the dividers in just seconds.  This was destined to become my traveling swatch set.

No second ring was available at this point so I grabbed a scrap of lavender with white polka dot ribbon and threaded the second set onto it.  This set will stay in my storage box with the folders. 

The longest part of the entire project was embossing the tags, and anyone who does this type of embossing that doesn’t take long at all.  

The end result is two sets of swatches that will allow me to shop and plan with ease in the future.


Don’t do embossing?  Then think about other things you do create with.  You could make similar sets to keep samples of colors of paints, chalks (be sure and seal with fixative so it doesn’t smear), colored pencils, fabric.  The possibilities are endless.

Not a crafter?  Are you remodeling?  Attach samples of your wallpaper, drapery fabric, dabs of your paint, small photos of your furniture etc to them so when you are shopping you have the exact samples you need to match up to.

An additional hint here, that I’ve used numerous times when trying to match fabrics, upholstery samples etc and I have nothing I can cut a swatch from to haul with me.  Embroidery floss.  It’s cheap, it comes in hundreds of colors, every color and hue under the rainbow.   Plus it is very portable.  Attach a good size piece to the swatch card to haul with you instead of lugging sofa cushions around like I saw one woman doing. 

Whatever your need to match up, or to avoid buying duplicates of these little swatch cards are very handy.

Jan who loves the look of these swatches and the ease they came together in OK


Monday, February 17, 2014

OFFENDING HOME OFFICE: PART 2


Well that day or two some how rolled into other S.H.E. projects and here it is February 2014.  Some additional progress has been made here and there between this and that last update, but nothing to write home about.

So two days ago I started challenging myself to get after the “pretty-up” work.  Meaning the nuts and bolts organizing of the office.  There are still some big things to remove from the room entirely, but the guys will deal with that, because it’s their stuff.  

Detail work is my job.  So I set a goal, one organized, clean-up project per day.  No excuses.  I of course have started with my area, because the guys are still sorting their big stuff out. I also know more what I want.  

For my birthday and Christmas the guys gave me some great equipment to work on the card business with and I of course have hit a sale or two to get the small “go withs” sticking very carefully to my $50 per month budget for such purchases. 

Bringing new things into the craft room/office made me more determined to be organized with it so I could use it easily.  So I started there.

The new machine was a Cuttlebug, which is a hand cranked embossing machine.  It uses embossing folders and die cuts. I also received two of the We  R Memory Keepers Punch and Score Boards  So I needed a safe, organized way to not only store these gifts, but it needed to be easy to use and to get to.


It was my dear husband, Gary,  that came up with the storage box for the folders and eventually the dies, once I purchase some.  It is a repurposed item, which is wonderful.  We had it already, even better.  In fact we have several of them, best! That means as my collection of folders grows so can my file system.

Those of you who were adults in the 80’s will remember Flip and File storage boxes for computer discs.  


By changing the direction of the filing system from front to back to lengthwise my embossing folders fit in perfectly.  Even better we still had the keys to lock these containers so when we start traveling with retirement I can safely take the boxes along and not worry about spillage. 

These folders come in various sizes, I currently only have the 5 X 7, the A-2 and border folders and not many of those.  So one box works well for all of them and the pressure plates as well. 

I wanted them to be very organized and easy to find and use.  So I first sorted them by size so smaller folders wouldn’t get lost between bigger ones and then wrote on each one with a permanent marker it the name for it.  

Next I sorted each size grouping by type. Celebrations, fauna, flora, shapes, textures etc.

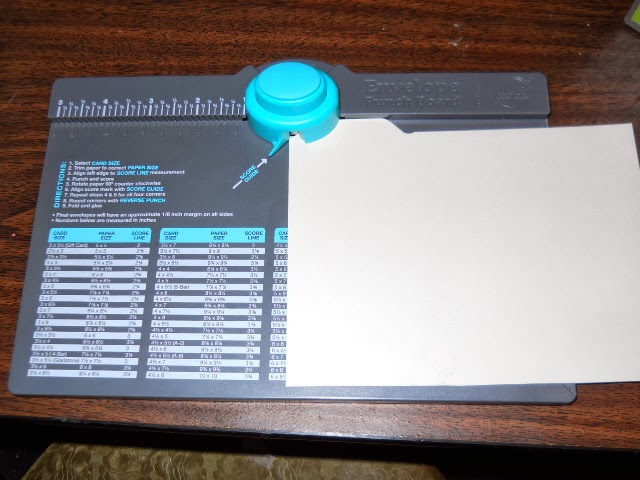
Since index cards don’t normally come in the sizes I needed for this project I created my own using previously owned poster board (I’m all about recycling you know and one side was still clean) and one of my other new pieces of equipment a We R Memory Keepers Envelope Punch and Score Board. 


 There are numerous utube videos on how to do this, just use the search terms “envelope punch board file folder”.  I just made dividers not folders to conserve space.  I also made each divider approximately ½ “ taller than each embossing folder, by the way I laid the folders on their long edge to get them to fit in the box perfectly. The photo below is pretty self explanatory if you don't want to mess with utube.  You use the punch lined up the way you see it to cut one side of the tab, then line it up on the opposite side at the length you want and use a straight edge to cut off the excess.


I file to the front so once the dividers were made it was a fast thing to insert them where they belonged.

Because I have so few folders right now there was plenty of room to put my plates for the Cuttlebug in the front of the box.  So everything fit nice and tidy.


Due to the massive culling we did I still had an empty bookshelf to put this box and Cuttlebug on, along with my Punch and Score Boards.  As I may in the future need to add other boxes due to adding an abundance of folders and dies the shelf is deep enough I could turn the two largest items at 90 degrees and easily put more boxes on the shelf.  See the photo on the side.

So that bit of organization was accomplished on the first day of my self challenge.
Jan who says now she knows here folders won’t get bent and she can do any embossing project quickly in OK.